 2 min read
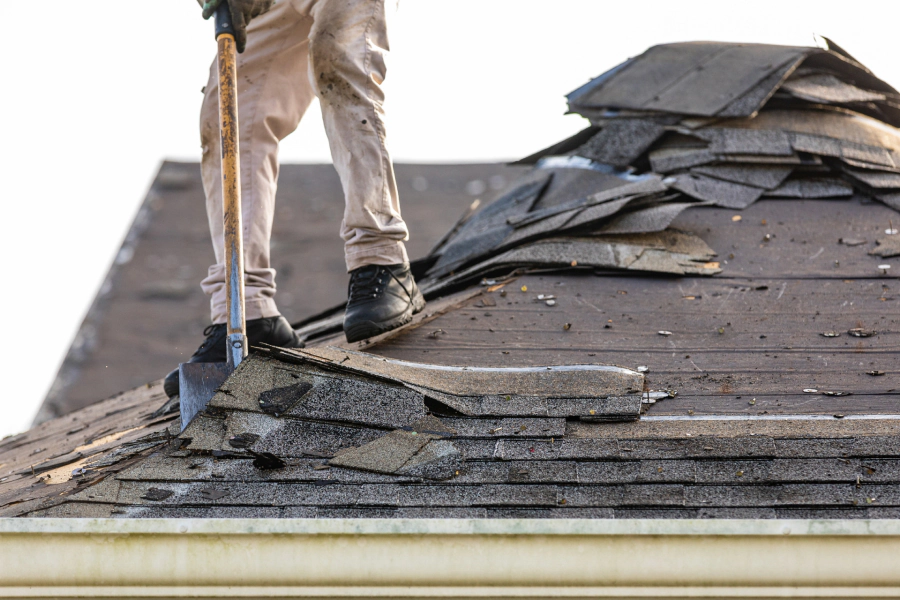
How To Remove Shingles (DIY)
Ah, the unattended roof, like the forgotten sock at the back of your drawer. Years of neglect can turn your once-mighty shingle roof into a sad, leaky excuse for protection against the elements. If your roof were a superhero, it would be asking for early retirement.
Now, you might be thinking, “Calling a professional roofing contractor sounds like an expensive fit for a king.” But fear not, fellow thrifty homeowners! You can save some of that hard-earned cash and embark on a DIY roofing adventure that’s bound to be memorable (and hopefully not too disastrous). We’ll walk you through the shingle-removing extravaganza.
WHEN IS IT TIME TO REPLACE YOUR ROOF SHINGLES?
Detecting damaged shingles can be trickier than finding Waldo in a crowd, but it’s not impossible. If your shingles are curling up at the edges like a teenager’s attitude, it’s a sure sign they’ve had too much water-induced stress. Moss and algae have made themselves comfy, indicating water has been partying on your roof. And if you find asphalt shingle granules clogging your gutters, it’s time for a shingle intervention. Finally, if your roof hasn’t seen any love in over two decades, it’s basically asking for a makeover.
WHAT MATERIALS DO YOU NEED TO REPLACE YOUR OLD SHINGLES?
Buckle up, DIY warrior, because the shingle removal process is not for the faint of heart. You’ll need more gear than a knight preparing for battle. Make sure you’ve got these trusty sidekicks by your side:
- Sturdy Ladders (to avoid becoming a real-life Humpty Dumpty)
- Safety Glasses (protect those precious peepers)
- Hammer (not for singing, but for pounding)
- Hammer Tacks (because regular tacks are just too soft)
- Plastic Tarps (for making your lawn look like a shingle convention)
- Roofing Nails (to play tic-tac-toe on the moon)
- Roofing Shovel (for all your shingle-scooping needs)
- Pry Bar (for the dramatic shingle reveal)
- Push Brooms (to keep your rooftop runway clean)
- Plywood Sheets (because why not add a little extra weight?)
- Adjustable Roof Jacks (no, not a guy named Jack who’s easily adjustable)
- Chalk Line (to draw some fancy rooftop art)
- Staples (for emergency document attachment)
- Ice and Water Barrier (to keep your roof cozy)
HOW TO REMOVE SHINGLES FROM ROOF: STEP-BY-STEP GUIDE
Before you go all Miley Cyrus and start tearing off those old roof shingles, do yourself a favor and consult a roofing professional for the lowdown on permits and local building codes. Safety first, folks!
HOW TO REMOVE SHINGLES FROM ROOF: STEP-BY-STEP GUIDE
Unless you’re auditioning for a role in a slapstick comedy, falling off a sloping roof is not on your bucket list. So, set up a roof jack and nail down a wooden border to keep debris from making a gravity-assisted exit. Rent a trash container and put it nearby for easy disposal. And don’t forget to wear a safety harness, rubber-soled shoes, and long pants; we’re doing roofing, not a catwalk.
STRIP THE ROOF FROM THE PEAK
Start at the peak, because why not aim high? Remove those ridge caps and top courses of shingles with a roofing shovel or a garden fork. Let them slide gracefully towards your roof jack, and any stragglers can join the trash container party.
WORK YOUR WAY DOWNWARDS
Pry off the shingles and felt paper as you make your way down the roof. Keep an eye out for loose nails—they’re not friendly projectiles. Push those shingles into a ball and give them a one-way ticket to the trash container. And be careful, some parts of the roof might be as sturdy as a house of cards in a rainstorm.
EVALUATE NEARBY FLASHING
While you’re at it, give the flashing around chimneys and skylights a once-over. Rust or cracks? Off it goes! Skylight and chimney flashings that still have some life left can stay, otherwise, they’re joining the shingle retirement home.
TEAR SHINGLES ALONG THE EDGES
Time to tackle the shingles near the roof edges. Leave them loose along the eaves and let your safety harness do the heavy lifting. If there’s some stubborn ice and water barrier, consider it a keepsake or pry it off, depending on its mood.
REMOVE VALLEY FLASHING AND VENT FLASHING
Now, take a swing at the flashing in the valleys and around plumbing vents. They’ve served you well, but it’s time for an upgrade.
CLEAN THE ROOF AREA
With all those shingles gone, it’s time to play “Find the Protruding Nails.” Sweep away debris and shingle granules, then cover your roof with a fresh layer of felt and an ice and water barrier. Trust us; it’s like giving your roof a cozy blanket for winter.
And if all this sounds a tad too adventurous, remember, professionals like Lanes Roofing Inc. are just a phone call away. They’ve got the skills, materials, and experience to make your roof replacement project a roaring success. Don’t wait until your roof becomes the neighborhood’s comedy act; contact us today for some serious roofing help! 574 207 4665
